
Commissioned by St. Anthony Hospital, Gig Harbor
SHOWING THE PROCESS OF THE LOST WAX METHOD

Photo Credit: Lee Giles III, Award Winning Photographer for the Peninsula Gateway (above photo of bronze being poured into cup)
READ More about the Foundry Process.....

The Arrival of "St. Anthony & Child" at the Foundry
His head was removed for transportation to the foundry in the truck. The towel is pinned to keep his rope moist before mold-making begins. It was a very hot summer day.

Ed & Mike @ the Bronze Works Foundry apply silicone (the very first layer of mold-making)

Mold-Making (See Above two pictures)
The original artwork is coated with liquid silicone rubber, which solidifies to create a form fitting coating over the sculpture. The silicone rubber mold is then coated with plaster, or other rigid backing (e.g. fiberglass), which creates the “support shell”. The flexible rubber mold and support shell are sectioned in such a way that they can be separated/peeled away from the original and removed. The mold and support shell can then be assembled to create a negative replica of the original on the inside walls of the mold.

Pouring the Wax
Molten wax is poured into the mold and allowed to come into contact with all inner surfaces of the mold. The excess wax is then poured out, leaving a thin coating of wax on the inner wall of the mold. This process is repeated multiple times, each time with the wax temperature reduced slightly so that additional layers of wax are built-up. Once the desired wax thickness is achieved (usually about 3/16” to1/4”), the wax is allowed to cool to room temperature and solidify. The support shell is removed an the rubber mold peeled away, resulting in a hollow wax “pattern”, or replica of the original artwork’s surface.

Chasing the Wax
The wax version of the sculpture may have imperfections in its surface introduced by the wax pouring process (e.g. flashing along the mold seam-lines; air bubbles; chill lines; and other flaws). The process known as wax chasing involves re-sculpting the wax pattern, to remove any such imperfections, and finishing the surface of the wax to match, as closely as possible, the condition of the artist’s original.
Spruing & Gating
The finished wax patterns are then fitted with a system of wax bars, known as “sprues” and a funnel shaped wax piece which will serve as the “pour cup”. These items, collectively referred to as “sprues & gates”, will later form the channels through which the molten bronze will flow during casting. Additional thin wax bars and rods may also be attached to the wax pattern for structural support and/or “venting” purposes (i.e. to allow for efficient flow of molten metal and trapped air/gasses during casting).

(Above picture shows the base and bottom or robe/feet - seen upside down)
Slurry/Shell
The wax pattern, complete with sprues and gates is immersed in a tank of “slurry”, a mixture of liquid colloidal silica and suspended solid refractory materials (e.g. silica and zircon). While still wet with slurry, the pattern is sprinkled with, or dipped into, granular silica sand, known as “stucco”. The process of alternately dipping into slurry & stucco forms a coating over the wax pattern, as well as the sprues & gates. After each “dip” the slurry/stucco coating is allowed to sit until thoroughly dried. Usually 9-12 coats of slurry/stucco are required to build-up the desired thickness of “shell”. After the shell is sufficiently thick, the shell is sealed by making a final dip in slurry, without a subsequent stucco coat. The piece is then air dried for at least 24 hours.

(Above is the Torso of both Saint & Child) - Do you recognize it?
Shell Preparation, De-Waxing & Patching
The dried shell is prepared by drilling holes at strategic locations(see the holes in the above picture?) and by cutting off the top of the “pour cup”. The prepared shell is then placed into a de-waxing furnace and the temperature raised to over 1,000 degrees Fahrenheit, allowing the wax to melt and drain from the shell. The temperature may then be raised to over 1,500 degrees, to thoroughly “burn off” any remaining wax residue within the shell. The wax drain holes in the hollow shell are then patched with a refractory cement. The resulting hollow shell now contains a negative impression of the wax pattern (and thus the original artwork) on its inside walls. In addition, where the sprue bars were located are now hollow tubes in the shell, through which the molten bronze will flow. Likewise, the location formerly occupied by the pour cup has been formed into a funnel, into which the molten bronze will be poured.

(See above 2 pieces of robe ready for the bronze pour)

Photo Credit: Lee Giles III, Award Winning Photographer for the Peninsula Gateway
Bronze Casting
Ingots of bronze casting alloy (an alloy of 95% copper, 4% silicon and 1% manganese) are melted in a crucible at temperatures approaching 2000 degrees Fahrenheit. While the bronze is being heated to its melting point, the Hollow shell is likewise heated in a kiln to elevate its temperature. The glowing orange heated shell is removed from the kiln just prior to the casting and the liquid bronze is poured directly from the crucible into the funnel shaped pour cup, filling the void within the shell left behind by the “lost wax”.
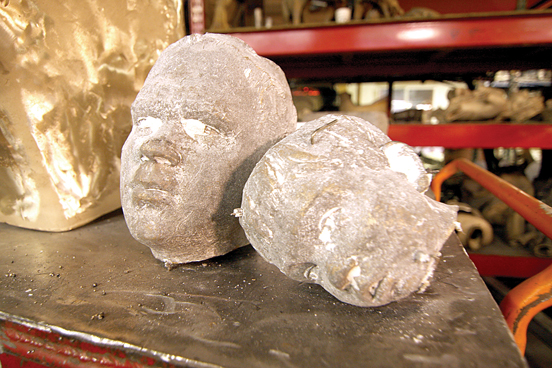
Photo Credit: Lee Giles III, Award Winning Photographer for the Peninsula Gateway (Heads of both Saint & Child)
Divesting
After casting, the metal filled shell is allowed to cool and the metal to solidify. The shell is then removed by simply striking it with a hammer. While the shell is strong and temperature resistant, it is brittle and thus shatters easily, revealing a bronze casting in the form of the wax pattern (and thus the original artwork). The metal bars formed by the sprue/gate system are removed using a “plasma cutter”, or other metal cutting equipment. Any remaining shell residues are removed by sand-blasting the bronze casting’s surface to expose the bare metal.

Photo Credit: Lee Giles III, Award Winning Photographer for the Peninsula Gateway (Mardie & the 1/4 Life Size Maquette. Day of the Bronze Pour of the Life Size Sculpture)


Assembly and Metal Tooling
Sculptures require casting of individual pieces separately. The metal pieces are fitted together and assembled by welding. The welding is done using Tungsten Inert Gas (TIG) welders and uses welding rod comprised of the same type of alloy (silicon bronze) used for casting. In some cases, for large or irregularly structured sculptures, an internal reinforcement structure may be incorporated. In such cases, a system of stainless steel bars, plates, tubes, etc. may be installed within the bronze castings to provide additional strength. After assembly and welding, the welded areas are tooled (essentially the metal surface is re-sculpted) to restore texture and finish of the welded area to match the condition of the original artwork.

Patina
Patina may be applied to the finished metal sculpture by a variety of means, usually involving heat and use of metal compounds in solution. For “hot patinas”, a propane torch is used to heat the metal surface to the appropriate temperature to achieve the desired effect. Different chemicals (e.g. nitrates of copper, silver, iron, etc.) and application techniques (e.g. brushing, squirting, spraying, etc.) can be used to achieve a broad range of colors and effects.
